Saturday, January 29, 2011

Stenciling the living room wall

The last room to be painted in my house (eh, at least for now) was the living room. The room was this pumpkin brown kinda color that clashed with the fireplace brick and made the room feel dark. Initially I had chosen a pale blue color (I don't remember the name). Waaaaay back in June I started with the closet. Way too blue. There was no way I could live with that color. I tried to. Meaning I stopped painting and left it like that for weeks months. I would say "we really need to finish painting the living room" but could never bring myself around to it.
Picture before I had even seen my house.

I ended up going to my favorite Orange store and I had them add some black paint to each of the cans (nearly 3 full gallons). I purchased a large 5 gallon bucket so I could mix them all together for color uniformity once I got home. I was nervous. I wasn't sure I wanted a dark color in there.

Original ugly color on the left. Pretty new color on the right.
Again, I started with the closet. As Jared and Lindey can both attest, I spent the whole time calling them in the room to see how it looked all the while worrying that it was too dark even though I liked the color. Bonus: at least I liked the color. The untinted blue was not even a blue that I liked much. It may have been the lighting. They kept assuring me it was fine and looked good and would you just shut up and paint already. So I did. I painted the whole room. And I started getting excited. And I started seeing one wall different than the rest.

Pretty color next to fireplace brick.
I showed some images to Jared to give him an idea of my vision. He liked it. He even asked if I would do the whole room that way. I refused. It was going to be a lot of work and wasn't what I was seeing for the room.

Ignore the piles.
 I wanted an accent wall. Too much would be.. well, too much. I didn't want it to be overwhelming.

Ah! So refreshing!
 I installed the closet shelving. I hung this closet a bit lower than the other closets so we could access the top shelf easier. The bottom rod is for little kid coats. We keep shoes on the floor but it's so very disorganized. That must change some time.

I can't get over the wall color, the trim color, and the tile all together! They look good!
So I took a trip to JoAnn's for the few supplies I would need for my project. Let's take a trip through blank blue gray wall to pretty blue gray stenciled wall!


I started by creating a pattern. I followed one I've seen around (and even more since). I modified it to work for me.

Next you trace it out on newspaper because you really need to make sure it's going to look as awesome as it does in your head.


Next you take a picture of the cat helping you with your scraps.


Trace and cut out the stencil. I used a box knife because that's what I had. Poor box cutter. Gets used for everything shy of cutting my potatoes. I picked up the stencil thing at JoAnn's. It came in a pack of three. There are other sizes to choose from but this one was perfect for my wall.


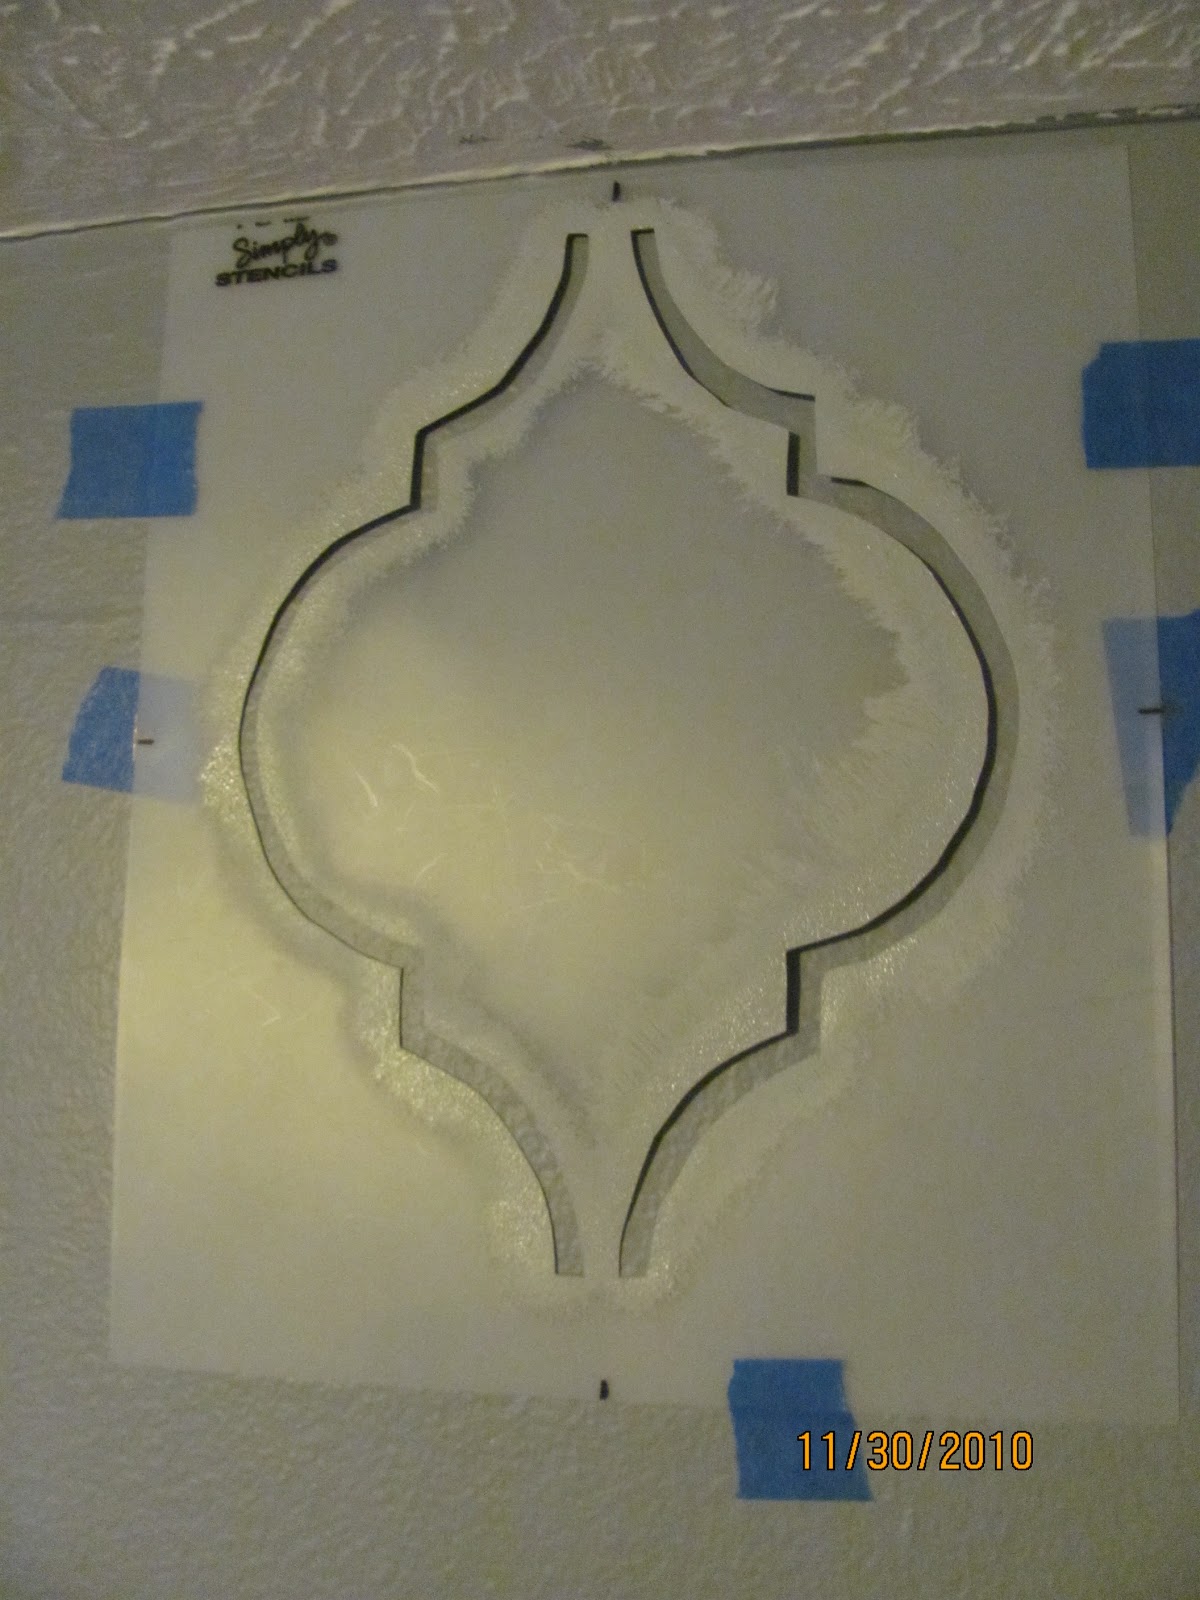
I found the center of the wall and then taped sections for where the stencil would go in between. The second row of tape that is underneath the stencil is what I'm referring too. Lots of measuring. Lots of tape. But I only did the first row to help map it out. Then I taped the stencil to the wall starting in one corner. Using a stencil brush, I put the paint on the wall.

Speaking of the paint... I bought a small white acrylic paint at JoAnn's and added some of the wall paint to it and mixed it up. It turned out to be the perfect amount of paint for my wall project. Score! It was actually a little lighter than I had in mind, but I let Jared help choose the shade and he liked this. Turns out that I really like it too.


Paint a few. Stand back. Admire.


Paint a whole row. Stand back. Admire.

Start on row two. For this, I centered it between the first row.


Paint second row. Stand back. Admire.


This is when I started the third row. I lined it up using the top and sides as guidelines. You can see that I would have to do some touch up work later.


Paint entire wall. Stand back. Admire. Gush. I should probably mention that I used the leveler for every single stencil. Even so, some are closer than others. Not extremely noticeable except to she who stenciled.


We moved the piano back and now I don't mind the color of the piano. It looks good with this new room color! Maybe one day I'll still paint it (and, ahem, attach its leg) but it's good for now.


I still can't believe how much of a different this wall color makes in the feeling of the room. It doesn't suck up light like the old color. It's really not that dark even though it looks darker in person than it does in these pictures. And I love this wall! Everybody who has seen it tells me that it looks like wall paper and can't believe that I had the patience to paint it. Lemme tell ya, it took several 6am mornings and nap times and please-watch-Kaelyn-pleeeease moments. I couldn't say how many hours it took but I can tell you that it was so worth it. I would do it again.

Today's Creative Blog

HookingupwithHoH


Sunday, January 16, 2011

6. Get Kaelyn to sleep the whole night without waking up: Progress

We have a plan to get from where we are now to where we want to be.


Goal: Kaelyn sleeping through the night in her own bed. (#5 and #6 in my 2011 to do list)
Starting Point: Kaelyn sleeping in our bed and waking up anywhere from 3 to 8 times a night.


The Plan
Step 1: Wean Kaelyn off breastfeeding.
Step 2: Spend happy time in crib or hammock (Jared and I differ in opinions on which one we should go with) progressively detaching myself from the scene as Kaelyn becomes more independent.
Step 3: Kaelyn sleeps in bed.
Step Somewhere: Wean Kaelyn off pacifier.
Step Somewhere Else: Kaelyn sleeps through the night.


The plan sometimes shifts as we discover how she reacts to one thing. I'm not certain whether to wean Kaelyn off the pacifier before or after she is sleeping in her crib. Nor do I know whether to get her sleeping in her crib before she sleeps through the night. I'm sort of playing it by ear. There are also several mini steps to go along with the bigger steps but I won't bore you with those details.


I'm here to update about #6 specifically step 1.


Making the decision (and putting it into play) to stop breastfeeding Kaelyn was the best thing I could have done for myself. My body was feeling the stress of it all (constantly waking through the night, hungry constantly, losing too much weight) and I'm so glad I started there. It didn't take very long. I just offered her whole milk instead of nursing. It took her a few days to catch on. My body said "thank the heavens!" and sang my praises.


I realized today that Kaelyn hasn't nursed in 3 days and I only feel very slight discomfort. Success!

Tuesday, January 11, 2011

Kaelyn's First Birthday Party

It was a toss up. Let's be real. Blog about Christmas even though it's waaaay over (although the tree IS still up...) or Kaelyn's birthday because she's just so darned cute? Wait, there are other topics? I do still need to blog about my living room stenciled wall. Another time.

For Kaelyn's birthday we invited family over. The agenda was dinner, dessert, presents, Christmas choir concert. I had a goal to have most piles of "stuff" gone. It was way past time. I succeeded. Most of it was gone. :)

Dinner was taco salad, fluffy fruit jello salad, rolls (which I totally failed at.... forgot to set the timer... but they made really good bread crumbs), and.... sparkling cider stuff. Kaelyn doesn't have a favorite meal (yet) so I made what I wanted to. I made the taco meat with ground beef from Mom's cow plus brown rice. I love that ground beef. There is a humongous difference between pasture raised and store bought.

The schedule got pushed so we  didn't really have dessert together. Kaelyn didn't even get hers until the next day. Just wait for the pictures. They're awesome.

I may have been the meanest mommy ever that day because Kaelyn also had a doctor's appointment that morning and I allowed her to get her very first shots ever. Three shots not including the blood work pricks. Kaelyn handled them like a champ though (I did give her medicine before we went). She cried but settled down fairly quickly afterwards. She didn't complain the rest of the day but she did sleep a little longer and was more subdued than normal.

I asked her to smile for the camera.

She got Garfield bandages. The bandaid they put on her finger after the blood work  bit stayed on for about two minutes  before she figured out how to pull it off.


From Mom and Dad, she got a new pair of shoes which are still too big for her.

She actually helped open the box...

And liked the elephant.

I have issues with the lioness. And the elephant isn't finished. Nor does he have a mate. And there's 3 or 4 more sets I still have to make.

Cousins Lilli and Grace gave her octopus toys that we use in the bath. She likes the water squirting out of them.

Cousins Lara and Vivi gave her a book with animals in it. She loves it.

Aunt Kimmi, Uncle Josh, and Grandma gave her an animal puzzle. She carries around the pieces and now knows the sheep says "baaa".

Nana and Papa gave her this big sheep and a shirt to grow into. Can you tell that every knew she loves animals?

Waiting.... waiting....
 
Chocolate cupcake! With cream cheese frosting!

No hesitation. Just go.
 
I told her I was trying to take a picture of he licking the cupcake. She actually obliged.

By now she was completely in love with the frosting and me taking pictures.

It was so hard to narrow down the pictures...

She's so cute in all of them!

A better tongue picture.
 
Now we're getting messy.
 
Surprisingly, she didn't care for the actual cupcake. Come on! It's chocolate!
But chocolate is chocolate.

Love my baby!

Saturday, January 1, 2011

My 2011 To Do List

I don't normally make New Years Resolutions. I tend to make them around my birthday when I make any at all. This year, I'm switching it up. Here goes, everyone. My 2011 To Do List! (I also figure that calling it a to do list makes it much more likely to get done rather than keeping a resolution which can dissolve. A to do list sounds much more like something I just have to do. Although some of these are more hopeful and wishful than maybe more likely to get done. Just some. Not most.) I have no idea how long this list will turn out to be, but you can bet that I'll be keeping you up to date on my progress on it!

I maintain the right to add to this list as I see fit.

1. Blog more.
2. Start a compost pile.
3. Start a garden.
4. Figure out a schedule that works for us and we will maintain with minimal convincing and hair pulling.
5. Get Kaelyn to sleep in her own bed again.
6. Get Kaelyn to sleep the whole night without waking up. Update.
7. Get pregnant.
8. Make cloth sandwich/snack bags.
9. Make huck toweling towels (aka, cloth paper towels).
10. Make and hang curtains for Jared's office.
11. Make and hang curtains for guest bedroom.
12. Build my desk.
13. Build bed frame for my bed.
14. Build bed frame for the guest bed.
15. Reattach the leg to the piano.
16. Finish Kaelyn's felt animal set.
17. Prune our cherry tree.
18. Obtain shelving for food storage.
19. Move our washer and dryer to nicer location.
20. Pay off two debts.
21. Fully refund our emergency fund.
22. Finish Mom's regency coat.
23. Learn how to make cha siu bow dough.
24. Organize my recipes better.
25. Continue running.
26. Get rid of the big pile of sticks in my backyard.
27. Find a handle for our sliding glass door.
28. Build a coffee table.
29. Build a night stand for Kaelyn's room.
30. Build a night stand for our bedroom.
31. Build a night stand for guest room.
32. Organize my fabric.
33. Make cloth napkins.
34. Do a complete rehaul of our 72 hour kit.
35. Frame and hang the big mirror for the living room.
36. Hang the big clock in the living room.
37. Build a mantle for the fireplace.
38. Build a bookcase for my music.
39. Learn about basements and how to care for it.
40. Acquire more comfortable seating.
41. Get my tail bone checked out.
42. Be brave enough to make a fish dish.