Showing posts with label pancake art. Show all posts

Saturday, September 24, 2011

Pancake Art: Autumn

To celebrate the beginning of Autumn (which today was a better day than yesterday because more blue skies + less low dark clouds and sky = happier Suki), today's pancakes was a tree with autumn-like leaves.


I wish colors came out truer on my camera but I haven't really figured out lighting stuff yet. I'm slow. The leaf colors are red, orange, yellow, and green.

Saturday, September 17, 2011

Pancake Art: Carter Bugs

Anybody with a little girl with clothes from Carters probably knows where today's inspiration came from!


Here we have a bug...


and some flowers!


And a cutie pie enjoying her pancakes with syrup. Yup, her mouth is stuffed!


The bug is right below the table line. Oops.


Sunday, September 11, 2011

Pancake Art: Tigers

Kaelyn has been interested in tigers and dragons recently because of my SIL's books and one of her favorite books from the library (they're all favorites) "That's Not My Dragon". Today I decided to really push myself and go with tigers. Specifically Ren, the first love interest in Colleen's books.

I grabbed my copies of Tiger's Curse off the bookshelves and figured out how I was going to do this. Remember: I AM NOT ARTISTIC. When it comes to pancakes, apparently, I'm at least willing to have my extremely non-artistic skills laughed at.

No, you may not see my sketches.

For starters, make your pancake batter.


Pour some of the batter in a bowl. However much you pour is how much you are doing in one color so think ahead! Put your food coloring in. I use gel but liquid or maybe even powder food coloring would work too.


Mix well. I don't know why my batter looks lumpy. It really wasn't.


Pour the batter into your condiment bottles.


Here I have this teal (to which I added more blue to make it more... blue), pink, gray (we couldn't figure out black again), and uncolored. I had more black and uncolored batter that is just sitting waiting until pancakes are cooked so I can pour it into the bottles to use.


You'll have to figure out this part on your own because every stove is different and I haven't done this with a griddle. This is how I do it with my stove.

Preheat the stove and pan. Keep it on the low side of heat.

Remove the pan from the heat and draw your design.

Start with your lines.


I drew all the uncolored liens first. Then I did the little nose in pink.


Here is the gray nostrils and mouth. Step back and cringe because it looks kinda pig-like.


Add stripes and relax your shoulders because it looks less pig-like.

Okay, here is where Kimmi fails. She was supposed to be taking my pictures and she just... failed.

So what you want to do is put your pan back on the heat and let it cook until the lines are puffy.

Remove from heat and fill in. The nose got more pink, the eyes became blue, and the rest was white. I mean, uncolored. Oh wait, the ears were gray too because I liked it.


After you get bored of making the same tiger over and over and over and over and over (we had family over so I tripled the batter--I was cooking pancakes for like... 2 1/2 hours!).... make other stuff! These are just a few things that I made.

White tiger = Ren.
Black tiger = Kishan.
Sword (yeah, the handle kinda looks like a crown or one of those puffy royalty hats.
Lotus = or grass as my oldest sister insisted. It's PINK and there are petals pointing to the side! How is that grass??? (Her response = how is it not?)

Other things I made were butterflies (special request for nieces), name plates, light sabers (except I made the mistake of putting hand guards on them because I had just been making some swords), and Star Trek ensignias.

Kimmi was thrilled I made pancakes for dinner because then she got to eat them and didn't hate me anymore.

We weren't sure if Valerie's family was going to be over because her middle child wasn't feeling well (rightw hen I started mixing pancake batter) and napping but she woke up while I was cooking pancakes (2/3 of the way through) and came over (3/4 finished) and helped finish off the pancakes.

Monday, September 5, 2011

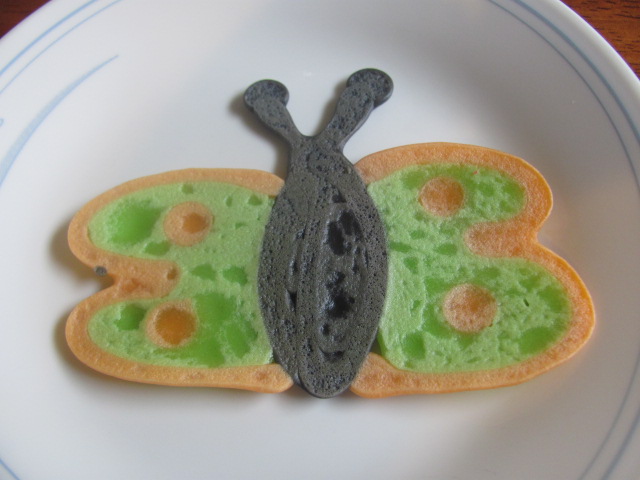
Pancake Art: Butterflies

Because of our travels on Saturday, I moved our pancake morning to today. It really takes a while to do this. Like... an hour. I'll be looking at large griddles because I really do enjoy this!!

Despite receiving a request for a tutorial on how I do my pancake art, I forgot to take pictures until they were already cooking. So instead, I'll give you my pancake recipe plus my pictures from today.


Pancakes
Original recipe from Joy of Cooking. I grew up with this recipe memorized in its tripled form. That's what it took to feed my family and in my memory, I almost always made them. I've tried other pancake recipes and this one is definitely my favorite. I have made a few changes from the recipe and it works for me but I'll make note of what I think is the original recipe amounts. It makes 14 4-inch pancakes. If you're making them regular-like.

Melt in microwavable bowl 2 Tbsp butter. (I use unsalted butter.)(Original recipe is, I think, 3 Tbsp butter. Eliminating butter means you have to grease your pan.)

With a whisk, combine a pinch of salt, 1 egg, 1 Tbsp sugar, and 1 3/4 tsp baking powder with the melted butter. (Oops! Totally forgot the baking powder this morning. It does make a bit of a difference as Jared mentioned how they tasted this morning.)(Original recipe calls for 3 Tbsp sugar. I've done it without and it tastes fine. I just prefer that little bit of sugar in it.)

Add 1 1/2 cups of flour and 1 1/4 cups milk to the bowl. (To make lump-free pancakes, alternate adding your flour and your milk making sure each addition is whisked smooth before adding the next thing. I usually do roughly 1/3 of the milk, then 1/2 cup flour, 1/3 more milk, etc.)(This morning I used powdered milk. That substitute is 1 1/2 cups water + 4 Tbsp non-instant powdered milk.)

On my electric stove top, I cook them over low heat (#2 on my dial) because my stove gets HOT and I don't like burned pancakes. Haha, I should show you what I think a burned pancake looks like... most people call them NORMAL. I put my oven on WARM (roughly 150 or 200 F) and put the pancakes in there until they're all cooked and we can sit down as a family to eat  them.

You can use any pancake recipe but you don't want it really runny or really thick. You definitely don't want chunks.


I don't have black food coloring so I created my own. You know when you have a ton of leftover icing on a plate because it's nasty and you just wanted the cake and then you were lazy and didn't want to get up to throw the plate away so you just sat there playing with it while listening to the conversation around you and you made this really gross grey color? That's what it looked like when I mixed it up.


But it cooked up all pretty and black! And purple always mixes up blue but then turns purple after it sits for a few minutes.


I'm not sure why there's all those spots on the pancakes because I don't remember them from last week. This was just one of my fun must-use-up-all-the-batter pancakes.


I made a few hearts. Kaelyn ate all the small pancakes. She refused the butterflies until we broke them up into small pieces.


I didn't take a picture of it, but I made this circle chain and Kaelyn picked the circles apart one by one to eat them. She still called them cookies at first but then she switched to pancakes.


Yes, I created a scene directly on my table. It was cute though!

Saturday, August 27, 2011

Pancake Art: Top Hat Smileys

Over the last year or so, I've run across some arts that focus around pancake art. I considered showing off some of the AMAZING things people have made with/from pancakes. Then I realized that would only make my pictures look horrible instead of just bad.

While Kimmi was staying with me over the summer, I showed her some of the pictures. She immediately said "we have to do it!" I was already planning on it. I just needed to buy the condiment bottles which I did earlier this week.

I'm starting to make Saturdays "Pancake Day". That might mean that we cook regular circular pancakes of any recipe or we go out to eat at iHop. Our newest option is pancake art! Or pancake doodles. No, really... what's below a doodle? That would be about where my skill level is. Funny enough, my drawing skills with pancake batter seem to be better than with pencil.

Funny conversation real quick before pictures.
Me: You're gonna hate me. Remember how you said we had to do the pancake art?
Kimmi (on the phone): Yeah...
Me: Well--
Kimmi: I hate you!!

But since there is a chance she'll be up here on some Saturdays over the school year to finish out her internship, there will be times when she too can have pancake art doodles whatever.

If I had a griddle, I could make more pancakes at once and it wouldn't've taken me an hour or whatever to make these. Kaelyn loved helping mix up the batter, but I was a selfish mommy and wouldn't let her help with the rest of it.

This was all my idea. I am proud of it. :)


After the first several, Jared told me that I should experiment and do something different. Was not colored batter and cute smiley faces experimental and different enough???


Kaelyn called them cookies and ate the chocolate chips first. Then she asked for more cookies. We told her to eat her pancake and she complied. And then asked for more cookies.


At least she loved them as much as she loves regular cookies I mean pancakes.


Anybody else done pancake art before? Anyone interested in seeing how I did mine? And any requests for future pancake art attempts?