 |
| Picture before I had even seen my house. |
I ended up going to my favorite Orange store and I had them add some black paint to each of the cans (nearly 3 full gallons). I purchased a large 5 gallon bucket so I could mix them all together for color uniformity once I got home. I was nervous. I wasn't sure I wanted a dark color in there.
 |
| Original ugly color on the left. Pretty new color on the right. |
 |
| Pretty color next to fireplace brick. |
 |
| Ignore the piles. |
 |
| Ah! So refreshing! |
 |
| I can't get over the wall color, the trim color, and the tile all together! They look good! |
I started by creating a pattern. I followed one I've seen around (and even more since). I modified it to work for me.
Next you trace it out on newspaper because you really need to make sure it's going to look as awesome as it does in your head.
Next you take a picture of the cat helping you with your scraps.
Trace and cut out the stencil. I used a box knife because that's what I had. Poor box cutter. Gets used for everything shy of cutting my potatoes. I picked up the stencil thing at JoAnn's. It came in a pack of three. There are other sizes to choose from but this one was perfect for my wall.
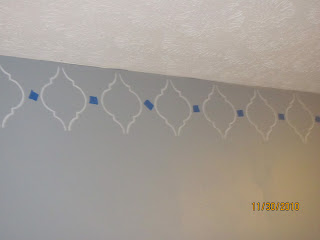
I found the center of the wall and then taped sections for where the stencil would go in between. The second row of tape that is underneath the stencil is what I'm referring too. Lots of measuring. Lots of tape. But I only did the first row to help map it out. Then I taped the stencil to the wall starting in one corner. Using a stencil brush, I put the paint on the wall.
Speaking of the paint... I bought a small white acrylic paint at JoAnn's and added some of the wall paint to it and mixed it up. It turned out to be the perfect amount of paint for my wall project. Score! It was actually a little lighter than I had in mind, but I let Jared help choose the shade and he liked this. Turns out that I really like it too.
Paint a few. Stand back. Admire.
Paint a whole row. Stand back. Admire.
Start on row two. For this, I centered it between the first row.
Paint second row. Stand back. Admire.
This is when I started the third row. I lined it up using the top and sides as guidelines. You can see that I would have to do some touch up work later.
Paint entire wall. Stand back. Admire. Gush. I should probably mention that I used the leveler for every single stencil. Even so, some are closer than others. Not extremely noticeable except to she who stenciled.
We moved the piano back and now I don't mind the color of the piano. It looks good with this new room color! Maybe one day I'll still paint it (and, ahem, attach its leg) but it's good for now.
I still can't believe how much of a different this wall color makes in the feeling of the room. It doesn't suck up light like the old color. It's really not that dark even though it looks darker in person than it does in these pictures. And I love this wall! Everybody who has seen it tells me that it looks like wall paper and can't believe that I had the patience to paint it. Lemme tell ya, it took several 6am mornings and nap times and please-watch-Kaelyn-pleeeease moments. I couldn't say how many hours it took but I can tell you that it was so worth it. I would do it again.


I can't believe that you had the patience to paint that sucker!
ReplyDeleteIt looks awesome :)
a little uneven... but awesome. hahaha.. (I couldn't help but throw that one in.)
Wow. I do NOT have the patience for that! Lucky for you, you do! It looks really great!
ReplyDeleteReed would notice non-even stencils. So it's a good thing you used a level :)
ReplyDeleteW.H.O.A.!!!!!!!!!!!! That is so much work, I'm impressed! It looks great!!!!
ReplyDeleteThe little flaws are the best part. They tell the world this is a one-of-a-kind, hand-made, Suki creation!
ReplyDeleteThis is incredible, I wouldn't have thought of doing something like this but it looks amazing!
ReplyDeleteholy crap. patience of a (what do they say?). you are amazing. it looks fantastic. i would rather have paid $40 for the whole wall stencil. and then 50 years down the road you will be a multi-millionaire and i wont.
ReplyDeleteIt seems that a string line would have been very helpful. Or even better, a laser level! Good job, it looks great!
ReplyDeleteThe stenciling is so awesome! What a great idea! We're new followers!
ReplyDeleteyou have more patience than me!!
ReplyDeleteI don't know if i could really do that for a whole wall or even just one row. That was some serious work that seriously paid off. Looks so good. I understand how in a different color scheme the piano might look an undesirable color, but I agree with you that the color of the piano looks awesome with that room!!