Many years ago, I decided that whenever I could have a garden, I wanted to have a square foot garden (SFG). My mom had a book about it and I had read it and liked it. Last year, when scouring for anything of interest, I came across that book again. Well, maybe I actually looked for the book. I don't remember (I claim New Mom Syndrome).
Then I discovered that there was a new version of the book out. I got it from the library and renewed it as many times as I could. I really should just buy it. The book is called
All New Square Foot Gardening: Grow More in Less Space! by Mel Bartholemew. Jared didn't question why that kind of garden or all the materials that we needed to get. That was nice. :) He helped too. Also nice.
With the SFG method, you don't have to worry about your current soil conditions, there are hardly any weeds, and since you are not doing traditional rows, your garden is so much more compact. I love the concept of vertical gardening too.
We talked about what materials to buy. It wasn't the cheapest it could have been but we are okay with what we got. To start out this year, I wanted three 4' x 4' boxes. The materials for the box, the grid, and the soil (peat moss, vermiculite, and compost) cost somewhere between $150 and 200.
I apparently don't have any pictures of building the boxes. It is just 2x6x8 boards that we cut in half (I cut most of them! with a circular saw! first time!) and then I screwed them together (two screws per corner). Easy peasy.
Then I mixed the soil. Easy peasy. But time consuming. Mel (as in Mel Bartholemew) created Mel's Mix which is this: 1/3 vermiculite + 1/3 peat moss + 1/3 compost (several different kinds) = best soil ever. Thanks to garden placement (way in the back of the backyard) and the closest water spiggot (on the side of the house that is further from the garden) and not super duper long hose, I mixed the soil in the middle of the yard. Again, no picture. My hands were dirty. That's my excuse.
I used a milk jug as a scoop and my large red metal bucket I got for my birthday as my mixing bowl. It made it manageable since I had no wheelbarrow. I got lots of exercise. Scoop times many, put some water in the container, mix with bare hands, carry to garden beds, dump in. Rinse and repeat. No wait, don't rinse. Your hands will just get dirty. Repeat MANY MANY MANY times. I think I did this over the course of three days. Not even three consecutive days because it kept raining.
The next thing to put together was the grid. The grid is to section off your 4x4 squares into 1' sections. I like organization and we both like definition so our grid is thicker than necessary. We got 1x2 boards which were really more like 3/4x1 1/2 boards. Jared cut them up. Some long, some short.
Here's the fun part. I got to use my Kreg Jig! Did I talk about that on the blog? I have talked about wanting one, but I got one earlier in the year using my $50 gift card to Home Depot and birthday money. A Kreg Jig makes pocket holes and it was definitely the easiest way to make the grid with how big our boards were for the grid plus have it still look somewhat good. Plus I really wanted to use it.
First you have to set up the Kreg Jig. You only have one drill bit but there is an adjustable part on it that you move to account for the thickness of the wood. You also need to adjust the height of where the drill bit goes on the Kreg Jig (you'll see where that is in a later picture) and then you need to adjust the clamp to be snug against the wood.
If I had a work table or bench, this would have been easier because I could clamp it to there. You can also screw the Kreg Jig directly onto somewhere but yeah, don't have anywhere. So I did it all hunched over like this.
My foot kept the Kreg Jig from moving. At one point, the adjustable part of the drill bit moved and I didn't realize it for about four holes. So now I have an extra hole in my Kreg Jig.... doesn't affect it at all. Now I know to triple check how tight that part is on.
Can you see the pocket holes in this picture? There are two.
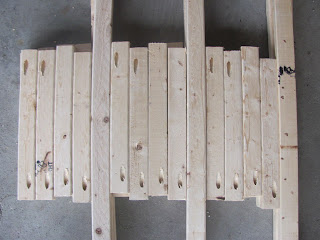
Here are the boards for one grid. There are three long boards, six short boards with one pocket hole, and six short boards with two pocket holes. You can see how the pocket holes are offset a little.
All the boards cut and ready for assembly. Drilling the holes went so quickly and easily. It was awesome.
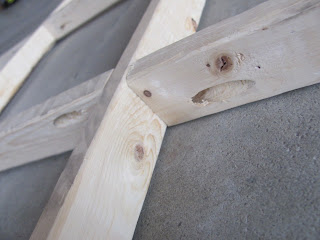
Here is one grid finished. It doesn't lay flat nor are all the short boards lined up straight. It's my first time and it's going on a garden bed. I think it's okay. :)
This is why the pocket holes are offset.
And then we got plants and seeds and FINALLY got them in the ground today. I haven't planted everything yet because I want staggered harvest for some things. Everything is being planted with the spacing Mel teaches in his book. It makes sense, but don't ask me to explain it. I was given some plastic dummy holes (thanks, Pat!) that helped me even though I ended up not using them when I actually went to plant because I completely forgot about them.

If you've ever seen my backyard or any of the pictures about it, you know how far back this garden is. Mel actually recommends the garden being close to the house but because of trees (ours and the neighbors), way back here was the best spot. This view above is NORTH looking SOUTH. The view below is SOUTH looking NORTH. I will be building some sort of trellis structure for each box which will be on the north side of each box. I took the three individual pictures from the south side so that as the garden grows, I can still take pictures without the trellis getting in the way.
My NW box. It only has half a grid because there are zucchini planted here and they need more space. Also in this box is spinach, carrots, brussel sprouts, pak choi (baby bok choi), and strawberries. Later on will be some tomatoes and more carrots.
My SW box contains strawberries, broccoli, kale, bush beans, lettuce, and a yellow plum tomato. Eventually it will have pak choi, tomatoes, and maybe garlic.
My SE box has lettuce, strawberries, bell peppers (yellow, red, and green), kale, and brussel sprouts. To this, I'm adding carrots, tomatoes, pak choi, bush bean, and maybe garlic.
You may wonder, like Jared did, why the same plant is spread out and why the peppers got to be together. My reasoning was that it would be easier to see all the harvest this way. I will be less likely to miss something because I'll be seeing something different in each square. Peppers, however, supposedly do better when next to each other. But not if they are different kinds. Hot peppers should be separate from sweet peppers. Unless you want some messed up pepper flavors.
My indoor tomato plants (that I started from seed!) are just about ready to plant outdoors. I might actually end up doing that tomorrow. My herbs (also started from seed) were doing great and maybe they still are and just growing at a slower rate. They are still green and the leaves are looking less like baby generic leaves and more like herb leaves.
Any produce I get will be worth all the work I've done so far. I'm just so happy to be doing something and even if it fails, it will be a learning experience and I can try again next year.


