Friday, May 27, 2011

Mother's Day Hairstyle

I've been needing a change in hairstyle. I was even thinking of going short (ish). That thought didn't last very long because I really would miss my long hair. However, with summertime and the hot weather arriving, I wanted to be able to keep my hair up.

Okay, okay. I know what you're thinking. "Um, Suki, your hair is always up." This is different! I swear. I wanted something other than the regular ponytail or standard single French braid.

Mother's Day was the perfect opportunity for me to try something new. I did learn one thing though.... it's hard to take pictures to show any details in my hair.


I started at the top and front of my hair and French braided it all the way around. I can see this also being very pretty with a rope braid but I'm not so good at those going around my head.

Oh, I also braided this while my hair was slightly wet still from my shower.


I braided all the way to the end of my hair and then coiled it around into a circle and secured it with bobby pins.


I stuck a pink bow I had made for Easter into the center of the circle. I have layers in my hair so there are tufts near the end that randomly stick out. I slept with this hair in and then just fixed the bobby pins so that the circled part was smaller and left the pink bow out.


Jared wanted to take a complete view video. So he did. :) Oh yeah, I also used hair spray afterwards. I especially like the trick to hair spray around your face and then use a tooth brush to brush the baby hairs into place for a more finished look.


Problems in the garden already

I took my camera out to the garden when I went to check on it today so I could take week 2 pictures. I came back inside frowning because I'm pretty certain my garden had a visitor last night.

My indoor herb garden looks interesting. All the stems are kinda weaved and tangled together. As long as they don't look dead, I'll still water them.


Trouble Tree drops presents down for me. I discovered that they sprout in my lovely nutrient-rich soil in no time flat. Seriously--within a day of falling. If only the seeds I plant sprouted this quickly.


NW Garden. I think the carrots are sprouting--not that you can tell in this picture.


A few days ago I found three of my tomato plants looking like this. :( Only one top portion was still on the ground so at first I thought maybe it happened in the windy storm we had a few nights ago. My opinion has changed after other things I saw today.


SW Garden. My kale sprouted here.


A strawberry!!! Unfortunately... this is the only berry left out there. Yesterday's count was five. The stems that the other berries were look like the tomato plant picture above.


And my poor broccoli plant. All of its leaves look like this (the other broccoli plant remains untouched).


 SE Garden. One of the lettuce plants is doing pretty good compared to the rest. Also, one of the bum tomatoes was on the north side of this box so I just planted a watermelon seed.


The flower on this pepper plant looked prettier yesterday.


So I'm thinking the culprit is a bunny -- my mom came to the same conclusion. She suggested a perimeter fence a few feet high. The plan is to take care of it tomorrow so please please PLEASE don't visit us tonight, bunny.

Monday, May 23, 2011

It's about time...

Who doesn't need a cutie pie update?? It's been a few months and her cuteness levels are just as high as ever! Kaelyn is 17 months and we are counting down the weeks that she can go to nursery.

This picture was taken General Conference weekend (beginning of April). I managed to put a bow in her hair. It didn't stay. When she left it alone, it was just too heavy for the amount of hair she has! The hair on the top of her head hasn't grown much but the sides and back has (a bit).


I got this picture of her flip flops. This was her first time wearing them. They matched her outfit well. Unplanned.


She has really gotten into stuffed animals and blankets. She doesn't have a favorite blanket but drags any of them around and when she is sitting with one she'll say "cozy". Her favorite stuffed animals is a monkey from her Grandma Lotti and her Winnie the Pooh bear.


She loves to read her books. She reads to herself and she begs us to read to her.


Modeling her Uncle Josh's new monkey blanket. She was excited that they were monkeys.


I made that bib. Apron. Bapron (so says the tutorial I made it from). Every morning I work out and I have an Access shake before and a Proflex shake afterwards. She gets a little bit in a cup with a straw. She helps me shake it too. She always comes running when I ask if she wants a shake. Jared tells me that when she sees the shaker cup, she asks for a shake.


Mothers Day. :) It was a beautiful day outside. I loved my hair that day and got many compliments on it.


She was enjoying some iHop breakfast. :)


Exercising with Mommy!


Her favorite picture pose is the head tilted.


She actually did help me with the power drill. Good, Kaelyn. Teach 'em when they're young.


Grrrrrr... Blogger won't let me upload the video. Maybe tomorrow. Because Kaelyn is so cute!

Other things about Kaelyn:
She knows Grandma, Grandpa, Joshy, Kimmi, Lindey, Jonathan, Lara, Vivi, Gracie.
She loves animals.
She can say barn.
She loves nearly all food. The one food she consistently doesn't like is egg in any form.
One of her favorite foods is pancakes.
She loves to help.
She says thank you and you're welcome.
Sometimes she tells me when she is pooping or has pooped.
She loves her shoes and being outdoors.
She searches her dad's pockets for his phone (and asks for it).
She sleeps in our room but in her own bed with a toddler rail.
She drinks three 8-ounce bottles of milk every night.
She amazes me every single day with her intelligence.

Friday, May 20, 2011

SFG - It's started!

Many years ago, I decided that whenever I could have a garden, I wanted to have a square foot garden (SFG). My mom had a book about it and I had read it and liked it. Last year, when scouring for anything of interest, I came across that book again. Well, maybe I actually looked for the book. I don't remember (I claim New Mom Syndrome).

Then I discovered that there was a new version of the book out. I got it from the library and renewed it as many times as I could. I really should just buy it. The book is called All New Square Foot Gardening: Grow More in Less Space! by Mel Bartholemew. Jared didn't question why that kind of garden or all the materials that we needed to get. That was nice. :) He helped too. Also nice.

With the SFG method, you don't have to worry about your current soil conditions, there are hardly any weeds, and since you are not doing traditional rows, your garden is so much more compact. I love the concept of vertical gardening too.

We talked about what materials to buy. It wasn't the cheapest it could have been but we are okay with what we got. To start out this year, I wanted three 4' x 4' boxes. The materials for the box, the grid, and the soil (peat moss, vermiculite, and compost) cost somewhere between $150 and 200.

I apparently don't have any pictures of building the boxes. It is just 2x6x8 boards that we cut in half (I cut most of them! with a circular saw! first time!) and then I screwed them together (two screws per corner). Easy peasy.

Then I mixed the soil. Easy peasy. But time consuming. Mel (as in Mel Bartholemew) created Mel's Mix which is this: 1/3 vermiculite + 1/3 peat moss + 1/3 compost (several different kinds) = best soil ever. Thanks to garden placement (way in the back of the backyard) and the closest water spiggot (on the side of the house that is further from the garden) and not super duper long hose, I mixed the soil in the middle of the yard. Again, no picture. My hands were dirty. That's my excuse.

I used a milk jug as a scoop and my large red metal bucket I got for my birthday as my mixing bowl. It made it manageable since I had no wheelbarrow. I got lots of exercise. Scoop times many, put some water in the container, mix with bare hands, carry to garden beds, dump in. Rinse and repeat. No wait, don't rinse. Your hands will just get dirty. Repeat MANY MANY MANY times. I think I did this over the course of three days. Not even three consecutive days because it kept raining.

The next thing to put together was the grid. The grid is to section off your 4x4 squares into 1' sections. I like organization and we both like definition so our grid is thicker than necessary. We got 1x2 boards which were really more like 3/4x1 1/2 boards. Jared cut them up. Some long, some short.


Here's the fun part. I got to use my Kreg Jig! Did I talk about that on the blog? I have talked about wanting one, but I got one earlier in the year using my $50 gift card to Home Depot and birthday money. A Kreg Jig makes pocket holes and it was definitely the easiest way to make the grid with how big our boards were for the grid plus have it still look somewhat good. Plus I really wanted to use it.

First you have to set up the Kreg Jig. You only have one drill bit but there is an adjustable part on it that you move to account for the thickness of the wood. You also need to adjust the height of where the drill bit goes on the Kreg Jig (you'll see where that is in a later picture) and then you need to adjust the clamp to be snug against the wood.

If I had a work table or bench, this would have been easier because I could clamp it to there. You can also screw the Kreg Jig directly onto somewhere but yeah, don't have anywhere. So I did it all hunched over like this.


My foot kept the Kreg Jig from moving. At one point, the adjustable part of the drill bit moved and I didn't realize it for about four holes. So now I have an extra hole in my Kreg Jig.... doesn't affect it at all. Now I know to triple check how tight that part is on.


Can you see the pocket holes in this picture? There are two.


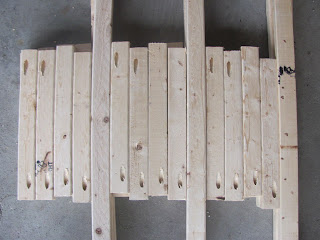
 Here are the boards for one grid. There are three long boards, six short boards with one pocket hole, and six short boards with two pocket holes. You can see how the pocket holes are offset a little.


All the boards cut and ready for assembly. Drilling the holes went so quickly and easily. It was awesome.


Here is one grid finished. It doesn't lay flat nor are all the short boards lined up straight. It's my first time and it's going on a garden bed. I think it's okay. :)


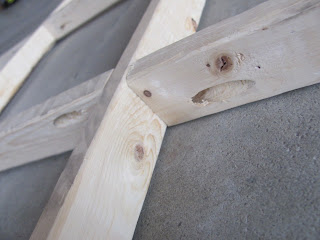
This is why the pocket holes are offset.


And then we got plants and seeds and FINALLY got them in the ground today. I haven't planted everything yet because I want staggered harvest for some things. Everything is being planted with the spacing Mel teaches in his book. It makes sense, but don't ask me to explain it. I was given some plastic dummy holes (thanks, Pat!)  that helped me even though I ended up not using them when I actually went to plant because I completely forgot about them.


If you've ever seen my backyard or any of the pictures about it, you know how far back this garden is. Mel actually recommends the garden being close to the house but because of trees (ours and the neighbors), way back here was the best spot. This view above is NORTH looking SOUTH. The view below is SOUTH looking NORTH. I will be building some sort of trellis structure for each box which will be on the north side of each box. I took the three individual pictures from the south side so that as the garden grows, I can still take pictures without the trellis getting in the way.

My NW box. It only has half a grid because there are zucchini planted here and they need more space. Also in this box is spinach, carrots, brussel sprouts, pak choi (baby bok choi), and strawberries. Later on will be some tomatoes and more carrots.


My SW box contains strawberries, broccoli, kale, bush beans, lettuce, and a yellow plum tomato. Eventually it will have pak choi, tomatoes, and maybe garlic.


My SE box has lettuce, strawberries, bell peppers (yellow, red, and green), kale, and brussel sprouts. To this, I'm adding carrots, tomatoes, pak choi, bush bean, and maybe garlic.


You may wonder, like Jared did, why the same plant is spread out and why the peppers got to be together. My reasoning was that it would be easier to see all the harvest this way. I will be less likely to miss something because I'll be seeing something different in each square. Peppers, however, supposedly do better when next to each other. But not if they are different kinds. Hot peppers should be separate from sweet peppers. Unless you want some messed up pepper flavors.

My indoor tomato plants (that I started from seed!) are just about ready to plant outdoors. I might actually end up doing that tomorrow. My herbs (also started from seed) were doing great and maybe they still are and just growing at a slower rate. They are still green and the leaves are looking less like baby generic leaves and more like herb leaves.

Any produce I get will be worth all the work I've done so far. I'm just so happy to be doing something and even if it fails, it will be a learning experience and I can try again next year.

Monday, May 9, 2011

The Dining Room

Our dining room got a makeover. In my head it is still a dining room. In reality, it has rarely functioned as a dining room; however, we still have the need to occasionally use it in its intended function so I kept that in consideration. I think I have been very successful but we'll see how it goes in practice.

Before pictures, I also want to add that a space of *my own* is something that I have wanted for a while now. Someplace for me to corral my scriptures, household binder, the laptop, and such. I definitely wanted a desk and I desperately needed a bigger craft area. I found myself using the dining room table to cut material out. Sometimes I even moved my sewing machine off the crappy desk to the table.

So when I changed the family room around (oh, I didn't mention that yet? uh, yeah, that happened too), we decided (no really, Jared decided this with me) that we could move all my craft and sewing things into the dining room.

Here is a before picture. A WAY before picture. Like before we bought the house picture.


And here's a before picture but not quite as before as above.


Welcome to my new space! It's not ultimately what I want or decorated or anything. But it's mine. An excellent first step if I do say so myself.


You can see our $30 Goodwill table. It's been cleaned but needs some love still. I just don't know what kind of love yet. I pushed it against the wall right next to a plug for the sewing machine and it  gives me walking around space.


This is most of my stash. I think. Well, maybe half. There's fabric, sewing supplies, stuff, stuff, more stuff. Since then I have added two more large items to that area so that would be more stuff. This doesn't include any of my paint. That is actually in the basement. It also doesn't include any decorating items like picture frames and jars. Also in the basement. The bottles are in my kitchen. <3


My sewing machine has a place! And the ironing board can stay set up right behind it. I dream of a newer and nicer sewing machine. And a serger. One day in my lifetime.... one day. I feel like my wishlist is far too long. This one was free and does an okay job.


The crappy desk which is my current desk. This will be replaced with another desk soon. My grandmother is giving me one of her desks which was going unused. I hope it fits in this little space. If not, I'll be rethinking this layout. Or something.

The big black thing is a shredder. It remains unplugged until needed. Next is a bag with my scriptures, study guides, colored pencils. The clear plastic container are my files that I wrote about here. Then my laptop and my household binder. And my phone.

The printer has joined this space for the moment. It sits up on a little shelf thing which makes it better but this area is so small to begin with that the printer is ginormous. We considered putting it up in Jared's office but the silly wireless decided to stop working on the printer. And I do use it. Just not frequently. But.. well, for now it's here. We'll see how long it stays. It probably depends on that new desk....


In the remaining corner, I put the mannequin with Mom's regency era jacket that still isn't finished. (Hey, Mom, here's a reminder I need the dress. If you read this.)

And that concludes the dining room turned MINE ALL MINE tour.

Somehow I went from changing the blow up mattress for Kaelyn's crib mattress on the floor in our room to a family room and dining room change. The string of thoughts make sense. I promise. Jared followed it so it's got to make sense. I don't have any pictures of the family room yet. It's not yet finished. Not that this area is finished. But the family room still has a pile of stuff for me to take care of.

It may not be finished but I am in love with MY space.

Saturday, May 7, 2011

Downed Tree Part 2

Not to leave anyone hanging (because obviously you were), here is an update on that tree.


Sometime that morning (Thursday), AEP came out and restrung the power line above the tree. I'm still not sure how they knew to come out. I called them but got their automated message that talked about how there were power outages and that was top priority and everything else just wasn't very important right now. So I was pleasantly surprised to see them show up.


My sister and her family ended up coming up also. They were going to just drop off the chain saw (and I was showing my sister how to put sleeves on her jumper dresses and how to make pillowcase dresses) but my brother-in-law (Kevin, not Reed who helped with the backyard surprise) was itching to do something (says my sister) so we let him cut up the tree. I had just one request which I'll get to later.


Near the end, Jamie went out and started to separate the branches. Big branches, little branches, black and blue branches. Or maybe just brown and green.


Jared and Kevin teamed up to move these large chunks.


Hey look. Proof that the tree needs to come down all the way. Preferably before it splits again. Jared and I talked about the tree coming down. His question to me was "oh no, your clothesline will have to come down. What are you going to do?"


And we have lots of wood scattered around our backyard.


Are you wondering what my request was yet?? I wanted some chunks to be cut about this tall so it can be a side table. Awesome, right? I figured I can get some good out of it. I need to dry it and stuff. I don't know what stuff yet because I haven't read up on it yet. I'll attach either caster wheels or legs on the bottom (probably caster wheels. These babies are HEAVY.) so it's not sitting directly on the floor. Not all his cuts are straight but there are some pretty good ones. I'm only using one (probably the one pictured above) so if anyone wants one of the others (or any of the other wood for that matter), just let me know.

Here is a video to end it all. It won't let me upload the other video It's probably a good thing. That way you can't hear the conversation with Kevin. Then you won't hear us talking about Kevin hoping I have no reason to want him dead.